
Knowledge Base
Printing on Envelopes with your Sharp Copier
You can print addresses on envelopes using many programs, including Microsoft Word.
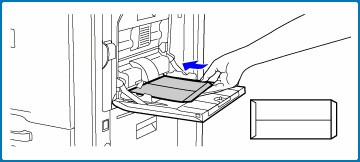
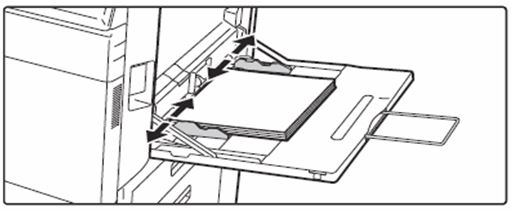
When inserting envelopes in the bypass tray, place them aligned to the left side in the orientation shown below. Only the front side of envelopes can be printed or copied on.
Place the front side facing down.
Important points when using envelopes
✖ Do not print on both sides of an envelope. This may result in misfeeds or poor print quality.
✖ Restrictions apply to some types of envelopes. For more information, consult a qualified service technician.
✖ Some operating environments may cause creasing, smudging, misfeeds, poor toner fusing, or machine failure.
Do not use the following envelopes:
✖ Those with a metal piece, a plastic hook or a ribbon hook
✖ Those with a string for closing
✖ Those with a window
✖ Those with a lining
✖ Those with an uneven surface, finished with titling or emboss
✖ Duplex envelopes or those with adhesive or other synthetic material for sealing
✖ Hand-made envelopes
✖ Those containing air inside
✖ Those damaged with a crease, fold mark or tear
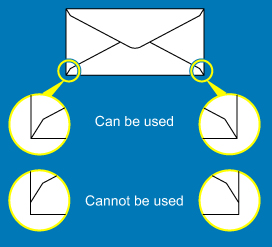
✖ Envelopes with the corner gluing position on the back not aligned with the corner edge should not be used as it may cause creasing.
✖ Print quality is not guaranteed in the area 10 mm (13/32") around the edges of the envelope.
✖ Print quality is not guaranteed on parts of envelopes where there is a large step-like change of thickness, such as on four-layer parts or parts less than three layers.
✖ Print quality is not guaranteed on envelopes having peel off flaps for sealing the envelopes.
Printing on Heavy Paper or Labels
The bypass tray is most commonly used to print on heavier paper, labels or Envelopes.
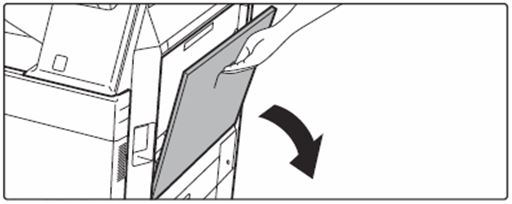
01. Open Bypass Tray
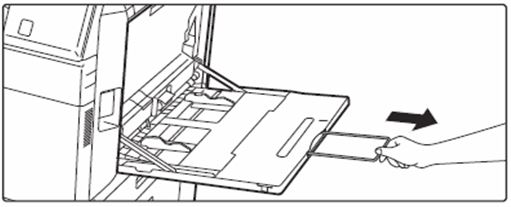
When loading paper larger than 8-1/2" x 11"R or A4R, pull out the extension guide all the way out.
02. Load the paper with the print side facing down.
Insert the paper along the bypass tray guides all the way into the bypass tray until it stops slowly. Inserting the paper with excessive force may cause the leading edge to fold back. Inserting the paper too loosely may cause skewed feeding or misfeeds. The paper must not exceed the maximum number of sheets and must not be higher than the indicator line.

03. Set the bypass tray guides correctly to the width of the paper.
Adjust the bypass tray guides so that they slightly contact the loaded paper.
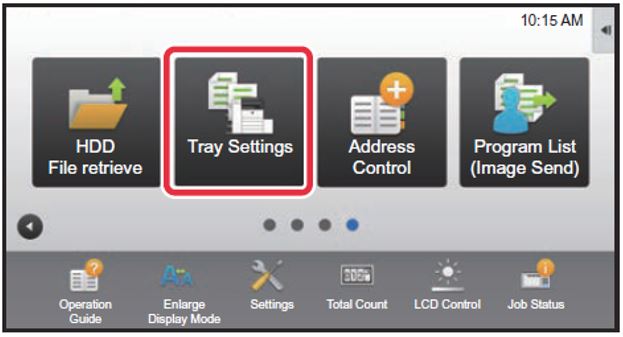
04. Press the [Home Screen] key.

05. Tap the [Tray Settings] key.
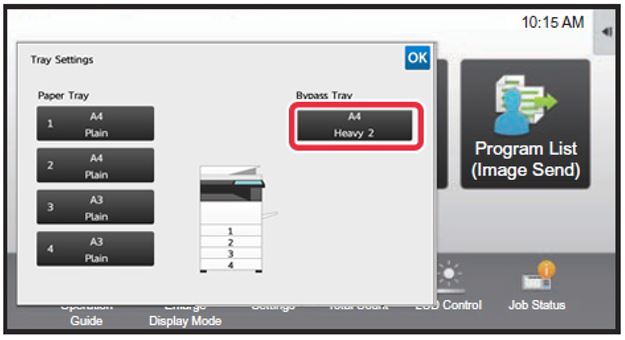
06. Choose the tray you wish to program (Bypass).
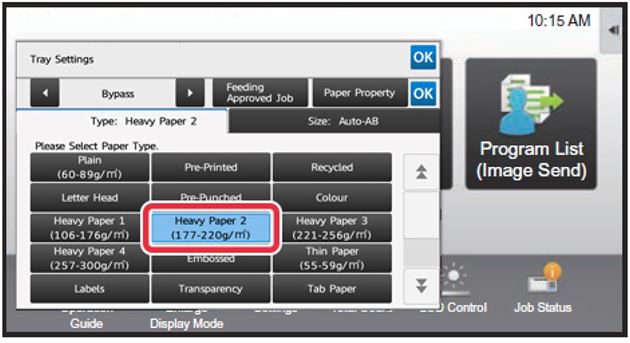
07. Choose the Paper Type.
Note: Heavy 1 (for paper thickness 106-176 GSM) Heavy 2 (for paper thickness 177-220 GSM) Heavy 3 (for paper thickness 221-256GSM) Heavy 4 (for paper thickness 257-300 GSM) Or Labels, for label printing.
There is a paper size tab which you can use for custom paper, otherwise if you have the paper loaded already in the tray, the AUTO-AB feature will auto select the size accordingly.
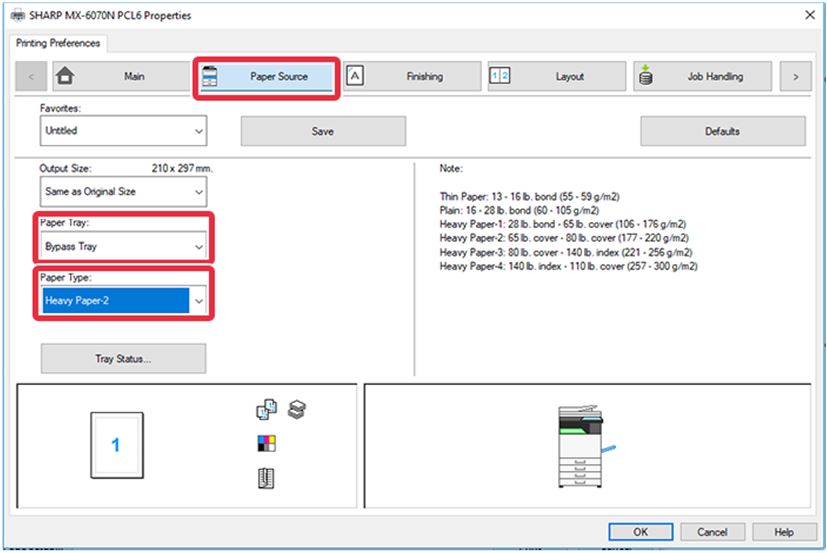
08. On your computer.
On your computer, open the file you wish to print, [Print] [Printer Properties] Locate the [Paper Source] tab and select the [Paper Tray] & [Paper Type] settings that match what you programmed in your sharp photocopier. You can now print your file to the special paper on your sharp photocopier Bypass Tray.
Paper Types & Settings Glossary
Specifications of plain paper, heavy paper and thin paper.
Plain Paper
- Sharp standard paper
- 21 lbs (80 g/m2). For paper specifications, see "SHARP STANDARD PAPER SPECIFICATIONS" in the "Start Guide"
- Non-Sharp standard plain paper
- 16 lbs to 28 lbs (60 g/m2 to 105 g/m2)
Heavy Paper
Heavy Paper 1 - 28 lbs. bond to 65 lbs. cover (106 g/m2 to 176 g/m2)
Heavy Paper 2 -65 lbs. cover to 80 lbs. cover (177 g/m2 to 220 g/m2)
Heavy Paper 3 - 80 lbs. cover to 140 lbs. index (221 g/m2 to 256 g/m2)
Heavy Paper 4 - 140 lbs. index to 110 lbs. cover (257 g/m2 to 300 g/m2)
Thin Paper
13 lbs to 16 lbs (55 g/m2 to 59 g/m2)
Printing Booklets on your Sharp Photocopier
You can print booklets on your Sharp photocopier with ease, if you have an optional finisher your machine can also staple and fold the booklets for you. Otherwise, your machine can program the job to print the booklets correctly and you can fold them manually.
Most importantly: Your file should just be a normal single page A4 File.
For best results, use a file that has page quantities in lots of 4 and of a file format of PDF.The Sharp photocopiers automatically lay out the pages in booklet format, using a predesigned booklet format will not print correctly. These instructions are to print and A4 booklet on A3 paper.
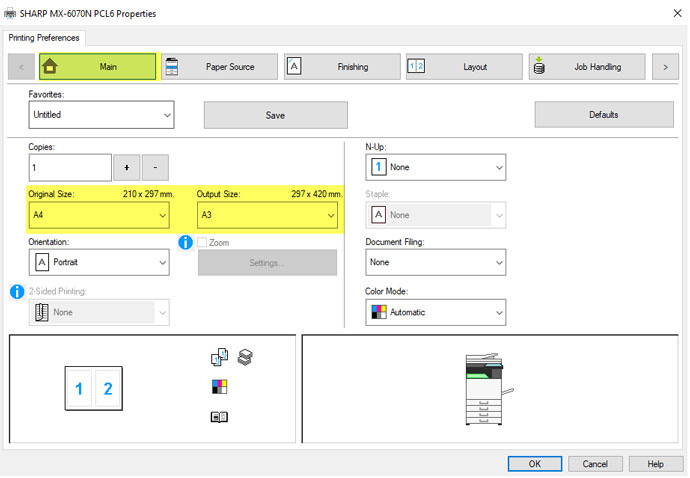
01. Open Printer Properties
On the [Main] tab, choose [Original Size: A4] and [Output Size: A3]
01. Click the Layout Tab
On the [Layout] tab, choose from the [Booklet] dropdown [Standard] and the [Output Size] dropdown, [A3]
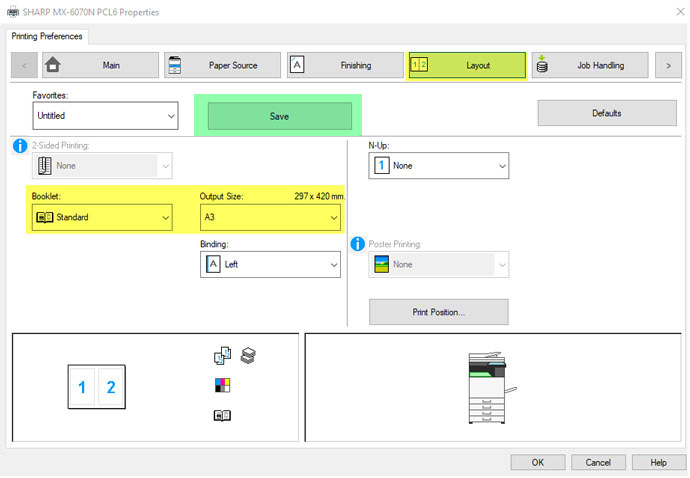
The highlighted Green box is optional- if you press save, you can save these settings so you can select the preset easier for when you want to print future booklets.
If you do not have a Saddle Stitch Finisher: Press [OK] and [Print]
If you do have a Saddle Stitch Finisher: Before printing, go to the [Finishing] tab, from the [Staple] drop down you can choose your staples.
